

Seam Guide for Brother Sewing Machine: A Comprehensive Plan
Brother sewing machines excel in creating precise seams, vital for garments and crafts; understanding seam guides enhances project accuracy and overall finishing quality.
Seam guides are invaluable tools for achieving consistent and accurate stitching, especially when using a Brother sewing machine. They act as a visual reference, ensuring your fabric remains aligned at the desired distance from the needle. This is crucial for professional-looking results, particularly in projects requiring multiple seams or precise measurements.
Essentially, a seam guide helps maintain a uniform seam allowance throughout your project. Whether you’re a beginner or an experienced sewist, utilizing a seam guide minimizes errors and saves time. They come in various forms, from simple markings on the machine to adjustable attachments, catering to different sewing needs and preferences. Mastering the use of a seam guide unlocks a new level of precision in your sewing endeavors.
Why Use a Seam Guide?
Employing a seam guide with your Brother sewing machine dramatically improves sewing accuracy. Consistent seam allowances are fundamental for garment construction, ensuring pieces fit together correctly. Without a guide, slight variations in fabric handling can lead to uneven seams and ill-fitting results.
Seam guides are particularly beneficial for beginners learning to maintain a straight stitch and consistent distance from the fabric edge. They also expedite projects, reducing the need for frequent measuring and re-adjustments. Furthermore, they are essential for quilting, where precise seam allowances are critical for block alignment and overall design integrity. Ultimately, a seam guide elevates the quality and professionalism of your finished projects.
Types of Seam Allowances
Understanding different seam allowances is crucial for successful sewing with your Brother machine. Standard seam allowance (5/8 inch) is common in commercial patterns, offering durability and ease of pressing. Narrow seam allowance (1/4 inch) is frequently used in quilting and delicate fabrics, minimizing bulk.
Variable seam allowance adapts to project needs; pattern instructions will specify the required width; Choosing the correct allowance impacts garment fit and construction. Wider allowances provide more fabric for adjustments, while narrower allowances create cleaner finishes. Your Brother’s seam guide assists in maintaining these precise widths consistently, regardless of the chosen allowance, ensuring professional-looking results.
Standard Seam Allowance (5/8 inch)
The 5/8 inch seam allowance is a cornerstone of many sewing patterns, offering a balance between fabric strength and a neat finish. Utilizing your Brother sewing machine with a properly adjusted seam guide ensures consistent results when working with this standard. This width provides sufficient fabric for seam finishing techniques like serging or zig-zagging, preventing fraying and increasing garment longevity.
It’s also forgiving, allowing for slight adjustments during fitting. When using a Brother machine, the adjustable presser foot and needle position features are invaluable for achieving this precise 5/8 inch seam, contributing to a professional and durable final product. Consistent accuracy is key, and the seam guide delivers that.
Narrow Seam Allowance (1/4 inch)
A 1/4 inch seam allowance is frequently employed in quilting and delicate fabric work, demanding exceptional precision from your Brother sewing machine. This narrower width minimizes bulk, crucial for intricate quilt piecing and achieving flat seams. Utilizing the machine’s adjustable seam guide is paramount for maintaining consistent 1/4 inch seams across an entire project.
The needle position adjustment feature on many Brother models allows for fine-tuning, ensuring the needle consistently lands at the correct distance from the fabric edge. This is particularly important when joining small pieces or creating precise corners. Accuracy with a 1/4 inch seam directly impacts the overall aesthetic and structural integrity of the finished item.
Variable Seam Allowance
Sometimes, patterns call for seam allowances differing from the standard, necessitating a variable seam allowance approach on your Brother sewing machine. This flexibility is vital for pattern adjustments or when working with designs requiring unique seam widths for optimal fit or aesthetic appeal. The adjustable presser foot, found on many Brother models, becomes invaluable here.
By carefully repositioning the presser foot, you can establish a custom seam guide, ensuring consistent stitching at the desired width. Combining this with the needle position adjustment offers even greater control. Remember to always test your chosen seam allowance on scrap fabric before committing to the final project, verifying accuracy and preventing costly errors.
Brother Sewing Machine Features for Seam Guidance
Brother machines boast built-in guides, adjustable presser feet, and precise needle positioning, all designed to facilitate accurate and consistent seam allowances for crafters.
Built-in Seam Guides on Brother Machines
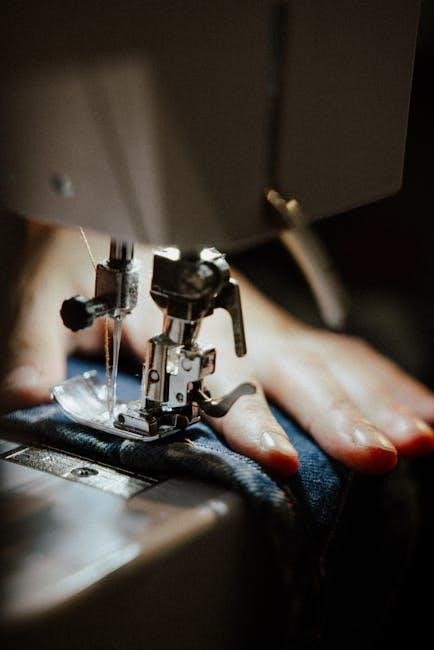
Many Brother sewing machines incorporate conveniently located, pre-marked seam guides directly on the needle plate. These guides, often etched or printed markings, provide visual cues for maintaining consistent seam allowances without needing additional attachments.
These built-in guides typically feature common seam widths like 1/4 inch, 5/8 inch, and sometimes even 3/8 inch, catering to a wide range of sewing projects. Utilizing these guides is straightforward: simply align the fabric edge with the desired marking while sewing.
This feature is particularly beneficial for beginners or those who prefer a simple, no-fuss approach to seam guidance. However, it’s crucial to verify the accuracy of these markings periodically, as they can sometimes become slightly misaligned with use. Regular cleaning around the needle plate also ensures clear visibility of the guides.
Adjustable Presser Foot for Seam Allowance
Certain Brother sewing machine models feature adjustable presser feet, offering enhanced control over seam allowances. These feet typically include a sliding mechanism or interchangeable guides that allow you to precisely set the desired distance between the needle and the fabric edge.
This adjustability is incredibly useful for projects requiring varied seam widths or for quilters who frequently work with 1/4-inch seams. The adjustable presser foot eliminates the need to switch between different feet for different seam allowances, streamlining the sewing process.
To use, loosen the screw on the presser foot, slide the guide to the appropriate measurement, and retighten. Always test the setting on scrap fabric before starting your project to ensure accuracy. Proper adjustment guarantees consistent, professional-looking seams.
Needle Position Adjustment for Precise Seams
Brother sewing machines often include a needle position adjustment feature, allowing for fine-tuning of the needle’s lateral movement. This capability is invaluable for achieving precise seams, particularly when working with specific fabric types or intricate designs. By shifting the needle slightly left or right, you can create perfectly aligned topstitching or edge stitching.
The adjustment is typically controlled via a dial or buttons on the machine. Experimenting with different needle positions on scrap fabric is crucial to understand how it affects the seam line. This feature complements seam guides, providing an extra layer of control for accurate results.
Utilizing this adjustment ensures consistent seam placement and enhances the overall quality of your sewing projects, especially when detail matters.
Using the Seam Guide Effectively
Properly utilizing a seam guide involves secure attachment, accurate adjustment to the desired seam allowance, and thorough testing for consistent, precise stitching results.
Attaching the Seam Guide
Securing the seam guide to your Brother sewing machine is a straightforward process, though specifics vary by model. Typically, the guide slides onto the presser foot, often snapping into place or requiring a small screw for tightening. Ensure the guide is firmly attached to prevent slippage during sewing, which would compromise seam accuracy.
For magnetic seam guides, simply position it on the needle plate; the magnet holds it securely. Before starting, double-check that the guide doesn’t interfere with the feed dogs’ movement. A wobbly or loose guide will lead to inconsistent seams, so prioritize a stable connection. Refer to your Brother machine’s manual for detailed instructions specific to your model’s presser foot and attachment mechanisms.
Adjusting the Seam Guide to the Desired Allowance
Precisely setting the seam guide is crucial for accurate stitching. Most Brother machines feature adjustable guides; loosen any securing screws or clamps, then slide the guide to the desired seam allowance marking on the presser foot or needle plate. Common allowances include 5/8 inch, 1/4 inch, and variable settings.
Double-check the alignment with a ruler to ensure accuracy. Tighten the screws or clamps to lock the guide in place. For magnetic guides, reposition it directly to the desired measurement. Always test the setting on scrap fabric before sewing your project to confirm the seam allowance is correct, preventing costly errors and ensuring professional-looking results.
Testing the Seam Guide Accuracy
Before starting your project, rigorously test the seam guide’s accuracy. Cut two strips of scrap fabric identical to your project material. Sew along the edge using the adjusted seam guide, maintaining a consistent speed.
After sewing, carefully measure the distance between the raw edge and the stitching line using a ruler. Compare this measurement to your desired seam allowance. If there’s a discrepancy, re-adjust the guide slightly and repeat the test. This iterative process ensures consistent, precise seams. Accurate testing prevents errors and guarantees a professional finish for all your sewing endeavors.
Troubleshooting Seam Guide Issues
Common problems include inaccurate allowances, slipping guides, and fabric puckering. Addressing these promptly ensures consistent stitching and prevents project frustration during sewing.
Inaccurate Seam Allowance
Dealing with inaccurate seam allowances requires a systematic approach. First, re-check the seam guide’s attachment and adjustment, ensuring it’s firmly secured and set to the correct measurement. Verify your machine’s needle is correctly inserted and the presser foot is appropriate for the fabric.
Test stitch on a scrap fabric piece, comparing the resulting seam allowance to a ruler. If consistently off, recalibrate the guide, or examine the machine for potential mechanical issues. Consider needle deflection, especially with thicker fabrics, which can subtly shift the seam.
Ensure consistent fabric handling; avoid pulling or pushing the material as it feeds through the machine. Finally, a properly maintained machine, with regular cleaning and correct needle selection, significantly contributes to accurate seam allowances.
Seam Guide Slipping or Moving
A slipping or moving seam guide is frustrating, impacting stitch accuracy. Begin by ensuring the guide is securely attached to the presser foot; tighten any screws or clamps. Inspect the presser foot itself for wear or damage, as this can cause instability.
Verify you’re using the correct seam guide for your specific presser foot model. Consider the fabric type – slick or stretchy materials may require a more robust guide or slower sewing speed. Check for lint or thread buildup under the guide, hindering its movement.
If the issue persists, a magnetic seam guide might offer a more stable solution. Regularly clean the area around the presser foot to prevent obstructions and maintain smooth operation.
Fabric Puckering Near the Seam
Fabric puckering near the seam, despite using a seam guide, indicates tension imbalances. First, reduce the presser foot pressure; excessive pressure can distort delicate fabrics. Experiment with slightly loosening the upper thread tension, allowing for smoother fabric feed.
Ensure you’re using the correct needle type and size for the fabric weight. A needle too small or too large can cause puckering. Consider using a walking foot, which evenly feeds multiple fabric layers, preventing stretching.
Test on a scrap piece of fabric to fine-tune tension settings before sewing your project. Avoid pulling or pushing the fabric while sewing; let the machine do the work.
Advanced Seam Guide Techniques
Explore magnetic seam guides for quick adjustments and custom-made guides for unique projects; quilting benefits from specialized seam guide applications for precision.
Using a Magnetic Seam Guide
Magnetic seam guides offer a versatile and convenient alternative to traditional clip-on guides for your Brother sewing machine. These guides adhere directly to the metal throat plate, providing a stable and easily adjustable seam allowance.
Installation is simple: position the magnetic guide at your desired seam allowance marking on the needle plate. The magnet securely holds it in place, allowing for smooth fabric movement.
Benefits include quick adjustments for different seam widths without tools, suitability for various machine models, and the ability to reposition effortlessly. They are particularly useful when working with multiple seam allowances within a single project. Ensure compatibility with your Brother machine’s throat plate material for optimal performance.
Consider purchasing a high-quality magnetic guide for lasting accuracy and reliability.
Creating Custom Seam Guides
Custom seam guides allow for tailored precision on your Brother sewing machine, especially useful for unique or non-standard seam allowances. You can craft these guides from readily available materials like sturdy cardstock, thin acrylic sheets, or even painter’s tape.
Construction involves accurately measuring and cutting the material to the desired seam width. Securely attach the guide to the throat plate using double-sided tape or a repositionable adhesive. Ensure it’s firmly fixed to prevent shifting during sewing.
Benefits include cost-effectiveness and the ability to create guides for specific project needs. However, homemade guides may lack the durability of commercial options. Regularly check for wear and tear and replace as needed for consistent accuracy.
Precision in measurement is key for reliable results.
Seam Guide for Quilting
Quilting demands exceptional seam accuracy, making a seam guide invaluable for Brother sewing machine users. Consistent ¼ inch seams are crucial for blocks to align correctly, resulting in a beautifully pieced quilt top.
Utilize the adjustable presser foot or a dedicated ¼ inch seam guide attachment. These features ensure uniform seam allowances across all quilt pieces. Slow and steady sewing is recommended, guiding the fabric edge along the seam guide.
Magnetic seam guides are also popular among quilters, offering easy attachment and repositioning. Regularly test the guide’s accuracy with a test strip of fabric to confirm consistent results. Precise seams contribute significantly to a professional-looking quilt.
Accuracy is paramount for successful quilting projects.
Brother Machine Specific Seam Guide Information
Brother sewing machines, like the CS6000i, XR9500PRW, and PE880, offer unique seam guiding features; consult your model’s manual for optimal use.
Seam Guide on Brother CS6000i
The Brother CS6000i boasts a convenient, built-in seam guide, enhancing precision for various sewing projects. This feature allows for consistent seam allowances, crucial for quilting and garment construction. Users can easily adjust the guide to their desired seam width, ensuring accurate stitching every time.
To utilize the seam guide effectively, attach it to the presser foot, aligning it with the fabric edge. Test the accuracy by sewing a sample seam and measuring the allowance. The CS6000i’s adjustable presser foot further contributes to precise seam control, accommodating different fabric thicknesses. Remember to consult the machine’s manual for detailed instructions and optimal settings; Consistent practice will refine your technique, yielding professional-looking results.
Seam Guide on Brother XR9500PRW
The Brother XR9500PRW provides a versatile seam guide system, catering to diverse sewing needs. This model often includes a snap-on seam guide that attaches directly to the presser foot, offering quick and easy adjustments for various seam allowances. The XR9500PRW’s needle position adjustment feature complements the seam guide, allowing for even greater precision, especially when working with delicate fabrics or intricate designs.
Users should test the seam guide’s accuracy by sewing test seams on scrap fabric before starting their project. Regularly check the guide’s alignment to maintain consistent results. The XR9500PRW’s robust construction ensures durability, making it a reliable tool for both beginners and experienced sewers. Refer to the machine’s manual for specific guidance on attachment and calibration.
Seam Guide on Brother PE880 (Embroidery Machines)
While the Brother PE880 is primarily an embroidery machine, its sewing capabilities benefit from utilizing seam guides for quilting and appliqué projects. Though it may not have a dedicated snap-on guide like some sewing-focused models, the PE880’s adjustable presser foot and precise needle positioning offer excellent control. Many users successfully employ magnetic seam guides, easily attaching them to the machine’s throat plate for consistent seam allowances.
For accurate quilting, carefully calibrate the magnetic guide or utilize the presser foot markings. The PE880’s ability to save stitch settings is advantageous for maintaining consistent seam widths throughout a project. Remember to test on scrap fabric first!
Maintaining Your Brother Sewing Machine for Accurate Seams
Regular cleaning, proper needle selection, and consistent presser foot maintenance are crucial for ensuring your Brother machine delivers consistently accurate seams every time.
Regular Cleaning and Oiling
Consistent machine maintenance is paramount for accurate seam guidance. Lint and dust buildup significantly impact stitch quality and can misalign the seam guide. Regularly clean your Brother sewing machine, focusing on the bobbin area and feed dogs, using a small brush or vacuum attachment.
Oiling key components, as outlined in your machine’s manual, ensures smooth operation. Proper lubrication reduces friction, preventing skipped stitches and maintaining consistent seam allowance. Pay attention to areas like the needle bar and hook assembly. Avoid over-oiling, as excess oil attracts dust. A clean, well-oiled machine is a happy machine, and a happy machine sews accurate seams!
Remember to always unplug your machine before cleaning or oiling it for safety.
Needle Selection for Different Fabrics
Choosing the correct needle is crucial for accurate seams, especially when using a seam guide. A dull or incorrect needle can cause skipped stitches, fabric puckering, and inconsistent seam allowances. Universal needles work well for woven fabrics, while ballpoint needles are best for knits, preventing snagging.
Heavier fabrics require larger needle sizes (e.g., 14/90 or 16/100), while lighter fabrics need smaller sizes (e.g., 60/8 or 70/10). Always refer to your fabric’s recommendations. A fresh, sharp needle ensures clean cuts and smooth fabric feeding, allowing the seam guide to function optimally. Regularly replace your needle, even if it doesn’t appear damaged.
Consider using a needle specifically designed for your project type.
Presser Foot Maintenance
Maintaining your presser foot is vital for consistent seam allowances when using a seam guide. Lint, thread fragments, and fabric fibers can accumulate under the foot, affecting fabric feed and accuracy. Regularly clean the presser foot with a small brush or compressed air after each sewing session.
Check for damage – a bent or scratched foot can cause uneven pressure and inaccurate stitching. Ensure the foot is securely attached to the shank; a loose foot will compromise seam precision. Lubricate the presser foot mechanism occasionally with sewing machine oil, following your Brother machine’s manual instructions.
A clean and well-maintained presser foot ensures smooth fabric movement, allowing the seam guide to function effectively.